Your Cart is Empty


Delivered every working day, our email newsletter inspires the world's greatest sports innovators to create the future of sport. Enter your email below to subscribe - it's FREE!!!!
SPT (Sports Performance Tracking) Gametraka exploded onto the scene in Australia is an affordable GPS device for team sports. Naturally their go to market was Australian Rules Football, but they have now targeted the UK and is used in football, rugby and gaelic football to name a few sports.
We asked one of our Ambassadors to take a look at SPT and give an honest review. This review was written by Oli Bonar.
If you don't know what SPT Gametraka GPS Device is, then please feel free to watch the Official Video below:
For the past 2 weeks I’ve been testing out SPT Gametraka. It’s a GPS similar to what elite athletes use to measure their performance during a match. In this review I will cover how to set it up, use it and analysing the data.
When you buy the GameTraka SPT you receive 2 boxes, 1 for the sports vest and the other for the ‘In Game GPS’. Both boxes are lightweight, so easy to handle.

Inside the Sports vest box there is very little packaging inside, apart from the vest itself.
The GPS box is nicely packaged, with the GPS sitting on a lid on the top of the box, with a compartment with the USB cable and instructions underneath. The instructions just tell you how to turn it on and off, the relevance of the lights, about charging the GPS, and also the warnings.
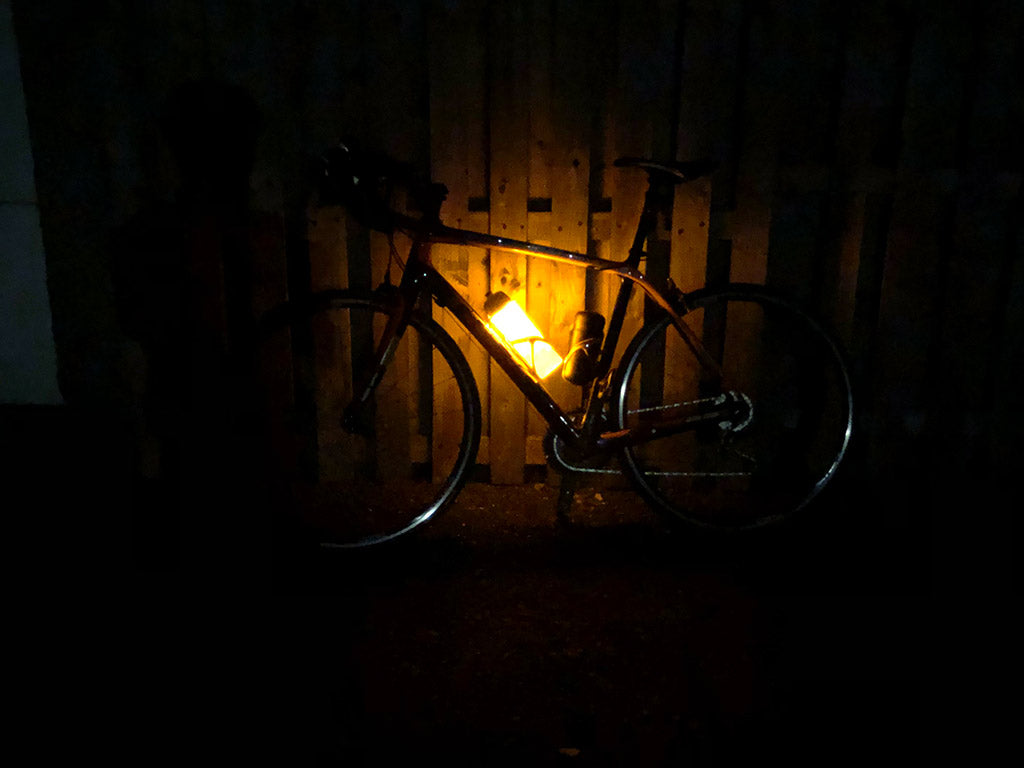
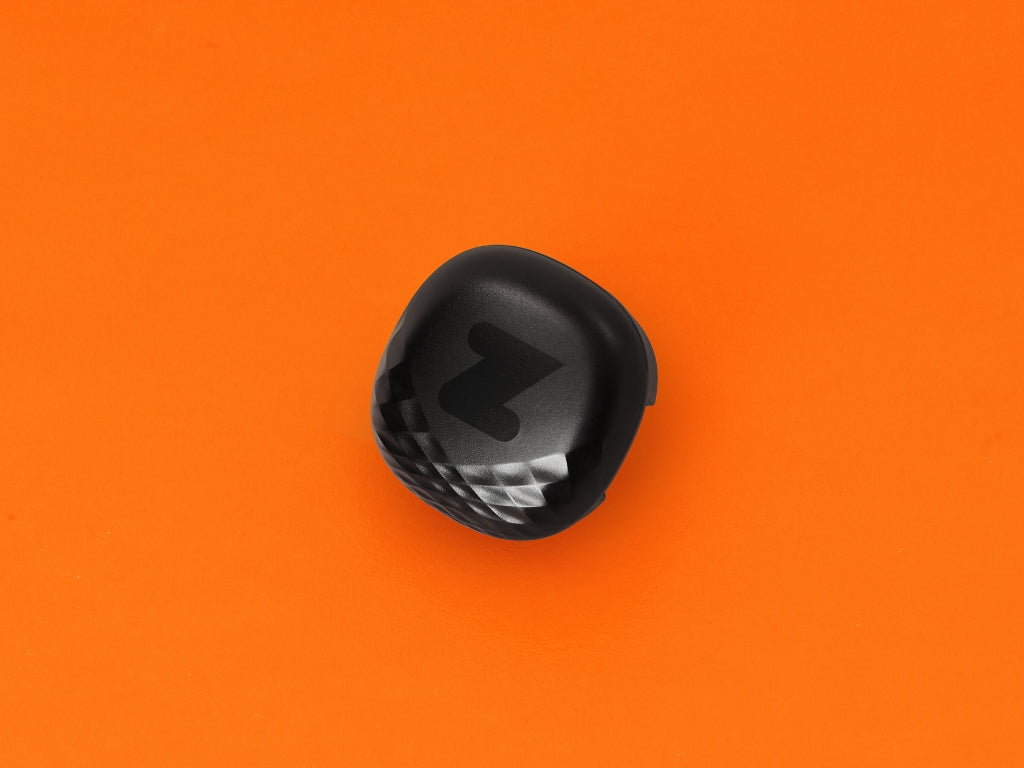
The GPS is 62 x 38 x 8 mm, about half the size of an Iphone 5, so pretty small and lightweight. It’s very simple in regards to features, with only a USB port and the on/ off button on the bottom right. It also has 3 symbols which light up at the bottom when it’s turned; these tell you if it’s recording the data, if the GPS has fixed onto your position and battery power. Apart from this, that’s it. Simple.

The sports vest comes in range of different sizes ranging from small (32 inch) to extra-large (42 inch). I tested the medium which covers 34-38 inch chests. Around the chest area it’s elasticated, so it doesn’t slide around when you’re running. On the back it has a pouch at the top, just below where your neck would be, this is where the GPS will go.
The setup is very straightforward, all you have to do is go onto the GameTraka website, input your name, email address, create a password; then just input your date of birth, gender and where you live. This will create your profile and you are ready to go.

The vest is straight forward to put on, with the lettering on the front and the pouch on the back, just below the neck.

In regards for the GPS, you turn it on by just holding down the side button for 5 seconds, until all the lights flash up and then alternating green and orange flashes. Then you’re ready to go, to do your training session or match. If you have someone to put the GPS into the pouch at the back, it’s easy, but if you are on your own, it’s a little bit of a fiddle to put in, but you can do it within 20 seconds max.
After use, just take it out the back of the vest, hold down the side button for 5 seconds and it will turn off. You will know when all the lights go off and stop flashing.
To connect the GPS to the laptop, you need to turn the GPS on and plug the USB into your computer, but it won’t register at first and you won’t be able to find the data. To overcome this, you go to the help page on GameTraka’s website and look under troubleshooting and click on the hyperlink saying ‘I can’t see the GPS on my computer’. It will talk about downloading something called Bridge, which will allow you to see the data from the GPS. You can download this for Windows or Apple Mac.
Once it has been downloaded, open it and you will come to a page asking you 2 options, either to download files from the GPS or Erase files on it. Click on download files. You will then be asked to name the file and then you can download the data.


When the data has been uploaded, go to the GameTraka website and click the upload button at the top of the screen. You then have to find the file you saved the data to and open it. It will then upload the data to the website. For the data you want click ‘Click to enter details for this performance’. It then opens a page where you enter what the data you have recorded shows, so either a match, training or other; whether it was at home, away or other and you can put any comments as well. Finally click ‘Assign Performance’ and the performance will appear on your dashboard.

When you go to your dashboard, you can see all the data that you’ve collected when wearing it. On the left hand side is your profile, where it tells you what team you represent, which I’ll cover later on this review. It also tells your personal bests from all of your data, reviewing the most distance you’ve covered, the intensity, your top speed and how many meters you covered in Zone 6, which is how many meters you were running at speed more than 21.6 Km/h or 6 mph.
So if you click on one of your performances, your taken to a page which the first thing you see is a graph displaying bar charts with coloured segments per bar. This tells you how much distance you covered either per minute or every 5 minutes. The 3 colours tell you how much of that minute or 5 minutes was made up walking (blue), jogging (yellow) and running (red).

Above the graph there is some information about how much distance you covered, the total time of your performing till you turned the GPS off, your top speed, the number of sprint efforts you made, as well as, how many meters you covered, either walking, jogging or running. There is also something called intensity which is valued. The intensity value according to GameTraka is a secret algorithm, which determines how hard you worked and the intensity of training. GameTraka say: ‘it uses your speed at points throughout the performance to understand when you were performing high velocity movement, and identified if you've been doing that for a while, and how many of them you've done throughout the performance.’ The harder and more brutal the session, the greater the intensity scoring you will get. According to Gametraka, the fittest and fastest players in elite squads would get somewhere in the range of 105-125.
Below the graph is a heat map, which shows you where you were and what ground you have covered over the time period, the red representing where you were most of the time and the green less. You can zoom in and you can see closer where specifically you were mostly. Below the map is a slider which shows the time period, you can use this to see your movements minute by minute over the pitch. Also to the right hand side is a table telling you the zone and how many meters you travelled in that zone, zone 1 being easy walking and 6 being the sprinting.


If you want to use this for your team, go to the top menu and click on the Team button. This will take you to a page, with 2 boxes saying either ‘Join Team’ or ‘Create Team’. If you’re starting up a team page for your players, click the icon in the ‘Create Team’ box. Another box opens up on top of the page asking you to fill in your team’s name, the sport you play and where your team is based. Once these details have been filled in, a new page appears with just your name at the top and your team’s details on the left hand side.

To add players, all you have to do is click on the ‘Invite’ button at the bottom of your team’s details on the left. This will send them an email with a secret code, which allow them to join your team. It doesn’t matter if they don’t have an account yet, as long as they make one they can still the join team. To join the team, they just click on the Team button on the top of the screen and then put their secret code into the ‘Join Team’ box and click ‘Submit’. This will take you to a page with all players’ names on it who have signed up and you can see all of their personal bests.
To assign a manager, just go to setting in the team’s profile on the left and this takes you to a page where you can edit the team’s details, you add a profile picture, the team’s ability, and just above it is the management section. All you have to go to the column saying ‘Manager’ and click on the person who on the team who is the manager.

If you’re a manager and you take the GPSes home with you after training or a match, you can upload players’ data on their behalf, by just going to upload and click on the box saying ‘Select a player’, go through how you normally upload data and that performance will be applied to that player.
As a team you could have only 5 GPSes and just swap them around between players to record their performances. You don’t have to have a GPS for each player. However, you will have to remember who used which one and at what times you gave it to them.

After matches you can analyse your team’s performance by creating an event. To do this, first you have to assign players to the data, like usual. A new heading will appear next to the name saying: ‘No events were found, click to create a new one’. Click on this and the page where you have to define whether it was a match, training or other will appear. Click on game, fill in the date, whether it was home or away, fill in the name of the opponent and then click create. You will then go back to the original page, where you select the event from the drop down where the text use to be. Finally press assign.
To view match performances, click on events and to the left will a be a column saying ‘Recent Events’ and just click on the match you want to analyse. This will take you to a page, similar to the one you see when you review your data as an individual, but instead you see everyone else’s data alongside each other. Here you can review, distance, intensity, top speed, zone 6 and at the top of the page you can see who got the best records for all 4 of these. This a good feature, as it will motivate players to get the best score and to beat their team mates.

In the corner of the graph is a button saying ‘Compare Players’, which is literally what it says. Here you pick 2 players and can compare their stats against each other. You first get the Summary page comparing intensity, distance, top speed, total time, sprint efforts, as well as the distance covered per zone. The player with the better result, their box will be a light grey, while the other player’s box will remain a dark grey. You can then toggle the 5-minute interval button and you can see each player’s graphs of how much walking, jogging and running they performed.
The 1v1 is probably the coolest bit about the data analysis, especially when you have more players and can see how each player’s performance differs.

Battery life of the GPS is about 6 hours and takes about 45 minutes to charge. When full, the battery light flashes. It can be charged from your laptop or a phone charger with has a USB connection.
The vest is machine washable, but at a 30’C temperature.
I didn’t find out if the GPS was waterproof, but I assume it isn’t due to the inbuilt USB port it has.
First thing before you even get going, just putting on the vest on makes you feel a bit stupid, as it looks like a sports bra, so as guy you feel pretty silly wearing it, despite you will be wearing kit over it. However, you don’t notice it when you are running and is comfortable.
So I first took the SPT for a few runs, before using it in some training sessions so I got use it. It was pretty good at tracking my movements, except when I ran pass a few tall buildings, where it didn’t pick up what so ever, so it missed half of my run. In the instructions it does tell you not to run near large obstacles like trees or buildings, as it won’t give you the best performance, which is true, it doesn’t. Also give it at least a minute for the GPS to get your location before you start training, otherwise you can miss a bit off the start of your session.
When I used it for an actual training session it was good, but I was kind of wanting a little bit more from it. It gives you your top speed, the distance you travelled, how much walking, jogging and running you’ve done, which is all good, but for its price I was looking for a little bit more. For example, where you have the heat map with the zones and distances for each zone on the left of the map, it would be good to see where you were performing these zones on the map, so you can see where they happened. Even just having some simple things like heart rate, which you can get on your IPhone would be useful.
Overall the product is a good concept, by offering the technology which elite athletes use to the masses for a lower price. I would use it for fitness training sessions, such as pre-season, so I can ensure my fitness is at a high level before the season starts again. I would also use it for a junior team or an amateur team, as I can compare performances between players, especially the 1v1 analysis is a nice touch to the product and is easily the best bit about the product. However, if I was an elite athlete I would be wanting a bit more information from it for its pricing, heart rate monitor for example. It needs only slight adjustments, such as offering a bit more information I could use, such as the heart rate monitor or being able to identify the different zones on the heat map. A great touch would be able to see a live performance from the coach/ manager’s phone. This is something GameTraka have already tried with Bluetooth, but they scrapped it, as it used too much data and took too long to upload, however, it would be good touch if they could use a different method, such as, Wi-Fi. The main improvement would be changing the design of the sports vest, as you feel stupid wearing it, as it looks like a sport bra.
Overall: 7/10.
Like the content and want to be ahead of the curve? Enter your email below to subscribe - it's FREE!!!!